How to create table with filestream column and Insert data
How to create table with filestream column and Insert data?
Filestream data type in SQL Server can be used to store images,documents,etc., in database.
In this blog I will explain how to create table with filestream data type.
Before creating table with filestream column,we have to enable filestream feature in SQL Server configuration manager.Follow “How to enable and configure Filestream in SQL SERVER 2008 / 2012”
Create a table and adding filestream data:
1.Create Filestream enabled database.
Syntax:
CREATE DATABASE test
ON
PRIMARY ( NAME = test1,
FILENAME = ‘c:\data\testdat1.mdf’),
FILEGROUP FileStreamGroup1 CONTAINS FILESTREAM( NAME = test3,
FILENAME = ‘c:\data\test1′)
LOG ON ( NAME = testlog1,
FILENAME = ‘c:\data\test1.ldf’)
GO
ON
PRIMARY ( NAME = test1,
FILENAME = ‘c:\data\testdat1.mdf’),
FILEGROUP FileStreamGroup1 CONTAINS FILESTREAM( NAME = test3,
FILENAME = ‘c:\data\test1′)
LOG ON ( NAME = testlog1,
FILENAME = ‘c:\data\test1.ldf’)
GO
2.After you have a filestream enabled database.we now need to create a table and add data to it.
Syntax:
CREATE TABLE [dbo].[test](
[ID] UNIQUEIDENTIFIER ROWGUIDCOL NOT NULL UNIQUE,
[Number] VARCHAR(20),
[Description] VARCHAR(50),
[Image] VARBINARY(MAX) FILESTREAM NULL
)
[ID] UNIQUEIDENTIFIER ROWGUIDCOL NOT NULL UNIQUE,
[Number] VARCHAR(20),
[Description] VARCHAR(50),
[Image] VARBINARY(MAX) FILESTREAM NULL
)
3.Insert values into table. In below example I am inserting image file in to the table.
Syntax:
DECLARE @img AS VARBINARY(MAX)
– Load the image data
SELECT @img = CAST(bulkcolumn AS VARBINARY(MAX))
FROM OPENROWSET(Bulk ‘C:\image\jellyfish.jpg’, SINGLE_BLOB ) AS y
– Insert the data to the table
INSERT INTO test (ID,Number,Description, Image)
SELECT NEWID(), ‘MS1001′,’jellyfish’, @img
– Load the image data
SELECT @img = CAST(bulkcolumn AS VARBINARY(MAX))
FROM OPENROWSET(Bulk ‘C:\image\jellyfish.jpg’, SINGLE_BLOB ) AS y
– Insert the data to the table
INSERT INTO test (ID,Number,Description, Image)
SELECT NEWID(), ‘MS1001′,’jellyfish’, @img
4.To view the table with filestream included column
How to enable Filestream in SQL SERVER 2008 and SQL Server 2012?
Filestream was introduced in SQL Server 2008 for the storage and management of unstructured data.
Follow the below steps to enable this filestream in SQL Server2008.Let us see one by one.
To enable filestream through SQL Server configuration manager:
1.Open SQL Server configuration manager.Open SQL Server services
2.Select the instance for which you want to enable Filestream.Right click the instance->properties.
3.In the SQL Server Properties dialog box, click the Filestream tab.
4.Select the Enable Filestream for Transact-SQL access.
5.If you want to read and write Filestream data from Windows, click Enable Filestream for file I/O streaming access. Enter the name of the Windows share in the Windows Share Name box.
6.If remote clients must access the Filestream data that is stored on this share, select Allow remote clients to have streaming access to Filestream data.
7.Click Apply.
Enable Filestream access level server configuration option:
In SQL Server Management Studio, click New Query.Execute the below query
[0 -Disables FILESTREAM,1 -Enables FILESTREAM for T-SQL,2 -Enables FILESTREAM for T-SQL and Win32 streaming access]
Syntax:
EXEC sp_configure filestream_access_level,2
RECONFIGURE with override
Create filestream enabled database:
- We can enable file stream while creating the database (or) If the database is already created we can enable filestream using alter database.
To create file stream enable database you can use below queryCREATE DATABASE DBname
ON
PRIMARY ( NAME = test1,
FILENAME = ‘c:\data\testdat1.mdf’),
FILEGROUP FileStreamGroup1 CONTAINS FILESTREAM( NAME = test3,
FILENAME = ‘c:\data\test1′)
LOG ON ( NAME = testlog1,
FILENAME = ‘c:\data\test1.ldf’)
GO
Enable filestream on existing database:
To enable file stream on existing database you can use alter database command with SET FILESTREAM similar to the example below or SSMS
ALTER DATABASE [DBNAME] SET FILESTREAM( NON_TRANSACTED_ACCESS = FULL, DIRECTORY_NAME = N’Directoryname’ ) WITH NO_WAIT
GO
GO
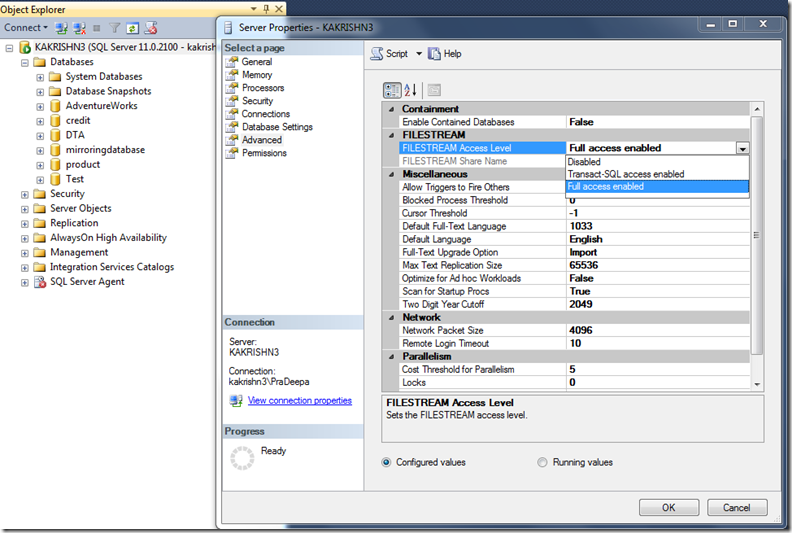
Enable filestream for database using SQL Server 2008 Management Studio:
1. Connect to SQL Server Instance using SQL Server Management Studio
2. In the Object Explorer, right click the instance and select Properties.
3. On the left panel click on the Advanced tab, then click on the drop down list of Filestream Access Level and select Full access enabled option.
4. Click Ok to save the changes.
![clip_image001[8] clip_image001[8]](http://sqlserverscribbles.files.wordpress.com/2013/07/clip_image0018_thumb4.png?w=631&h=524)

![clip_image001[4] clip_image001[4]](http://sqlserverscribbles.files.wordpress.com/2013/07/clip_image0014_thumb6.png?w=497&h=552)
